“Mom, it’s been two hours. This is so dumb, I am dumb. I am never doing this again.”
-Me facing the consequences of my choices
You know, I didn’t know that I’d be finishing my 2022’s resolution by making homemade dumpling wrappers with a pasta roller but alas, here we are.
To conclude the year of 2022 and trying out new recipes, I decided to end it with a bang by making rose siumai, the recipe taken from Of Mooncakes and MIlk Bread by Kristina Cho but can also be found here.
Upon encountering the section about making homemade dumpling wrappers, one could see that this was likely going to be one of those “…But why, Nicole?” situations. To which I would probably give the arbitrary response, “Because.”
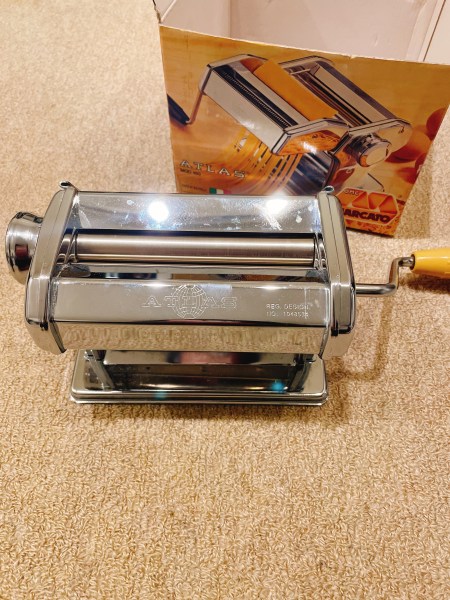
Because I wondered the same question as I sat on my living room floor, staring at my mom’s unearthed 30-year-old pasta roller and contemplating my life choices. As I picked out dried out pieces of God-knows-what out of the crevices of the pasta sheet roller (probably little bits of noodle that were older than me), I asked myself the question, “Is this worth it?”
Foolishly, I thought to myself, “Well, I never used a pasta roller before so I think it’s worth it. It can’t be that bad, right?” [Narrator: She would later learn that it can and would be that bad.]
My first experience with a pasta roller and I’m using it to make homemade dumpling wrappers.
Aight, let’s do this.
Act I: The Prelude
I decided to get the easiest thing out of the way first–the filling. After combining my ground pork, chopped up shrimp, and green onions together, I added all of the seasoning mentioned in the recipe, along with some sesame oil, soy sauce, and chicken bouillon, which brought this filling closer to the flavor profile of my mom’s dumplings. I then set it aside to marinate in the fridge.

Now came the exciting part of making dumpling wrappers.
While. pre-made wrappers were a legitimate option, when I saw that the book gave me an option to make my own wrappers, curiosity won out. Kristina explained that since making rose siumai required 3 wrappers and normal pre-made wrappers would be too thick to roll up, making our own wrappers where we could control the thickness would be most ideal. As I explained my plan to my mom (who was half listening to me at that point because she was still trying to understand why in the world I don’t want to just use pre-made wrappers and roll that out), she gave me her full support.
As in, she showed me where her pasta roller had been gathering dust for the last thirty years and pretty much gave me a response equivalent of , “okay, lol sure, here’s the roller but fyi, it’s gonna suck.”
I started with putting my dry ingredients for my dumpling dough together, which was just flour, turmeric (for yellow coloring), salt. As I whisked the ingredients together, I thought, “Huh. This looks not that yellow.”
So I kept adding turmeric. And more turmeric.
My mom eventually popped her head in the kitchen and said, “I can smell the turmeric from here, how much are you adding?”
After talking with her and doing a quick taste test of the dough, we’ve concluded that I’ve definitely added too much turmeric.
So, I threw that batch out and started again, remaking the dough with half of the amount of turmeric listed in the recipe. I microwaved some water and added the hot water to my dough. I immediately noticed that the dough took on a much more yellow tint upon the addition of liquid (there’s the yellow color I was looking for) I then made a shaggy sort of dough before kneading it for a couple minutes and wrapping it up into a ball to sit on my kitchen counter for the next hour.
At this point, I was feeling pretty good, despite the initial snag.
Act II: The Journey
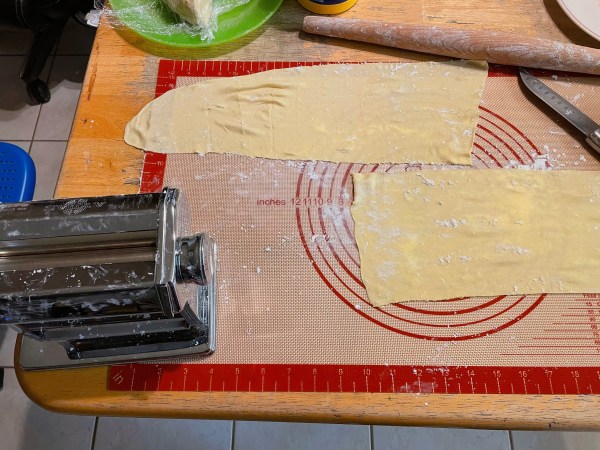
I first set up my work station on one side of my dining table. I unrolled the silicon mat and grabbed a rolling pin, some cornstarch, a knife, a 3-in cookie cutter, and a plate for all my dumpling wrappers. As I secured the clamp of the pasta roller onto the dining table, I ignored the side-eye my mom gave me when she briefly looked up from the Chinese drama she was watching from the other side of the table.
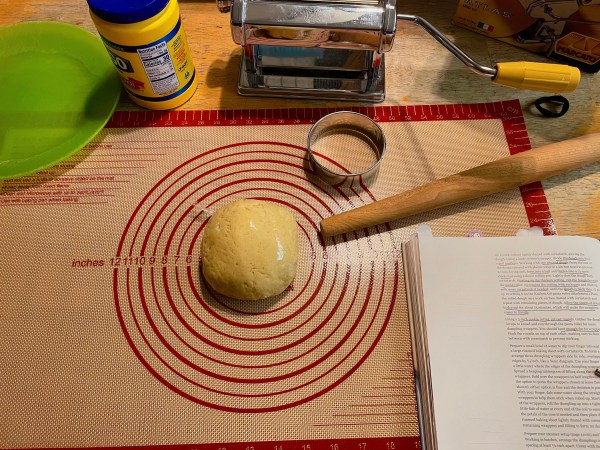
After dusting my surface with some cornstarch, I cut my ball of dough into four pieces and mentally prepared myself.
In the hindsight I did not have in that moment, I should have also emotionally prepared myself too.
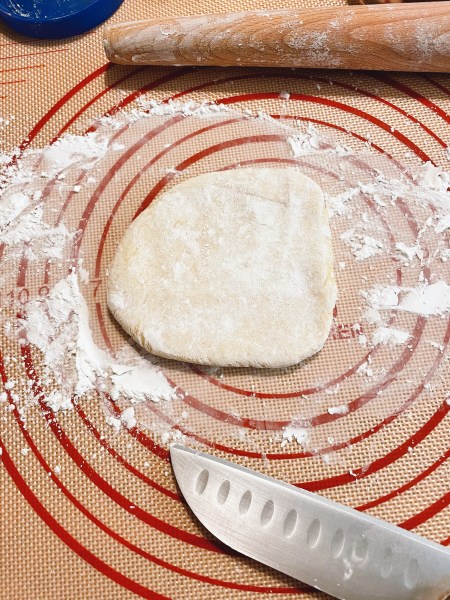
I rolled out one of the pieces into a 1/2″ disk and passed it through the pasta roller, starting at setting 1. As I became acquainted with the pasta roller and passing my dough pieces through it multiple times until I reached setting 6 (the recommended setting to reach in the recipe), there were a couple of key things I’ve learned rather quickly:
- Should be obvious but when you pass dough through increasingly thinner settings, the dough gets wider and longer.
- When dough gets wider, sometimes the dough edges can get stuck in the corners where the roller surface meets gears and you can now get metal shavings embedded into your dough.
I didn’t think “watch out for pieces of metal in your dough” would be something I have to worry about but there I was, looking for shiny flecks and trying to minimize metal contamination in my food. - When dough gets longer, the roller will neatly fold your dough in an accordion-like fashion for you but you don’t want that. When freshly pressed dough is folded and left like that, the layers tend to stick together and you’re left, gingerly unfolding and separating the folded layers, praying to God that this very thin dough doesn’t rip as you do so.
- When dough gets wider, sometimes the dough edges can get stuck in the corners where the roller surface meets gears and you can now get metal shavings embedded into your dough.
- For the love of all that is holy, please be mindful of how increasingly wide your dough becomes and hold onto your increasingly piece of dough to stop the roller from folding it as it presses it out.
- Again, here’s another “state-the obvious” point, to get your dough to the desired thickness level, you need to pass it through the roller at least 6 times to reach setting 6. You will need to repeat this process multiple times for each dough piece and reconstituted pieces of scrap dough you’ll generate as you cut out more wrappers.
To paint more of a visual of what this looks like, here is some math you didn’t ask for:
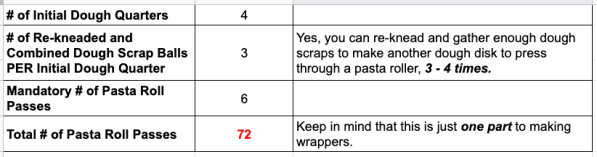
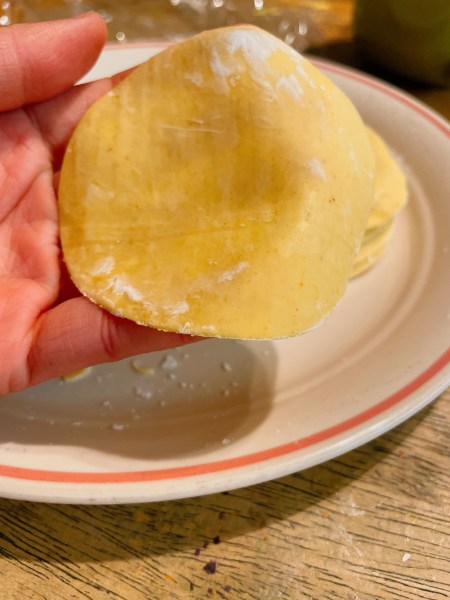
After I rolled out my very thin piece (setting 6) dough, I was supposed to let it dry out for 15 minutes before cutting wrappers out. Having understood the depth of the hole I inadvertently dug myself into, I decidedly had little patience for this step and immediately started cutting out wrappers. I internally wept up a bit as I gathered the leftover scraps of post-cut dough and made another ball to start the pasta rolling process all over again.
Over the process of a little over two hours, I went through the stages of grief and cut close to ~80 wrappers in two stacks, ending with the vow to never do this again.
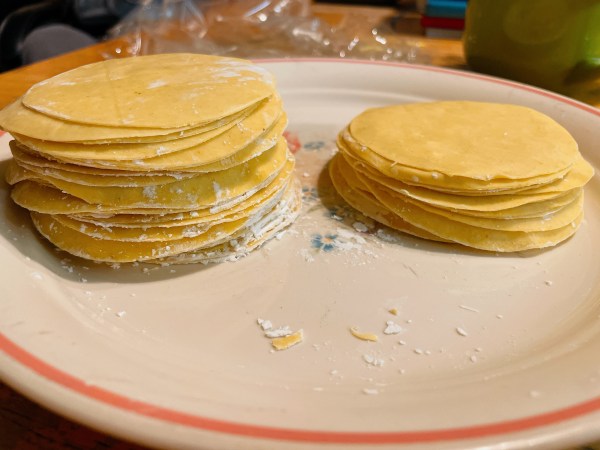
Proud of what I made, I interrupted my mom (who watched more than a few episodes of her Chinese drama at this point) to show her my stack of wrappers.
“Wow, those look so professional that they look store-bought,” she said.
“Don’t,” I replied, triggered.
I thought I would be making siumai in time tonight for dinner. However, I found those plans quickly changed by the time I reached to the end of this step.
Emotionally spent and a bit mentally broken, I took a dinner break/intermission from this recipe and again contemplated my life choices.
Act III: The Resolution
After getting over my brief moment of existential crisis, I moved onto the next portion of this recipe, which was assembling the roses.
With my mom helping me, this process was smooth and even fun. Even my mom, who has made siumai before, was able to have some fun with it too. It was a sweet time to bond with my mom. I ended up learning that her favorite dim sum item was pan-fried cheung fun.
The process for making these roses is fairly simple and based on the same idea/design as making charcuterie salami roses. We lined up three wrappers, slightly overlapping each other and placed a small bit of meat filling (it was easy to overstuff these so we learned to be careful) across the three before folding it up lengthwise like a three-chain mini taco. We then folded up the taco gently until it coiled up like a rose, slightly unfurling the outer folds to make it look more like petals.

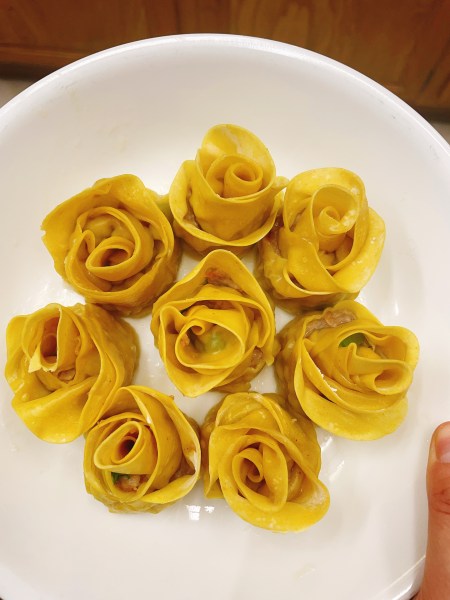
It actually looked sorta pretty.
My mom’s much more practiced with assembling dumplings together so she was able to wrap more siumai than I was. Some roses, we left the dumplings open while others were sealed shut with water. I personally thought the ones that were open, revealing the filling, seemed to look better.
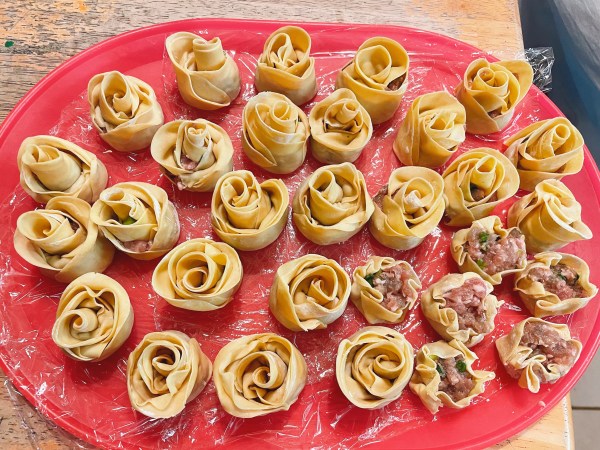
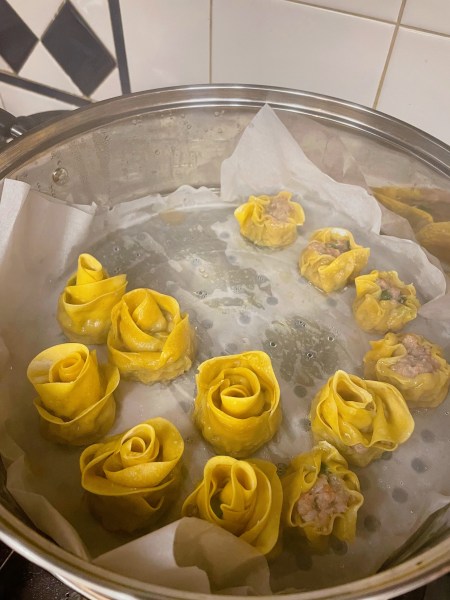
In total, we assembled about 24 roses and 6 normal siumai when we noticed we had an abundance of meat filling.
Which means I made (24 x 3 wrappers) + 6 wrappers = 78 wrappers.
The next day, we steamed the siumai for around ~10 minutes, which surprisingly kept their shape pretty well. They looked really good! These dumplings were slightly on the saltier side, which I think was due to the addition of soy sauce and chicken bouillon but they tasted quite good. The texture of the wrappers was on the chewier side, which was something surprising but not unwelcomed.
Overall, this made for a pretty satisfying New Year’s Eve brunch for my family. What a good way to close out 2022.
Did it taste good?
Yes
Did it match up to the aesthetic expectation?
Sure, it did.
Was it worth the work and the homemade wrappers?
0/5, definitely not. It definitively sucked. Save your time and sanity by buying premade wrappers.
…
I’m so tired.

Leave a comment